Making Monsters
The second level of Ecliptic is going to take a lot of inspiration from Aliens. Among the new monsters for this level will be one that resembles a facehugger.
WARNING: This post starts off with a bunch of pretty pictures but soon swerves sharply into propeller-head territory with lots of code!
Designing The Monster
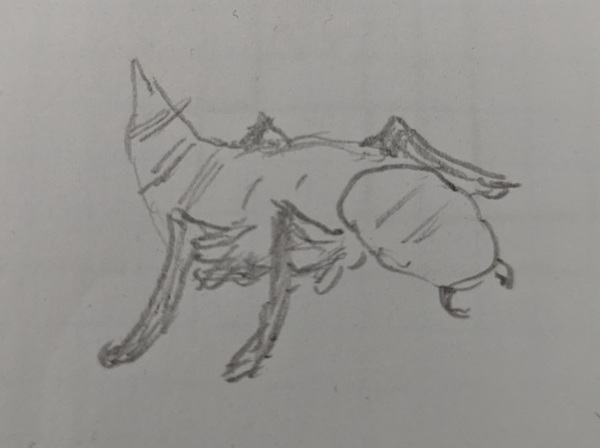
In this case, the monsters are kind of insect-like but with only four legs (mainly because, with my drawing skill, I find it hard to cram more into the small images). I started with a quick sketch:

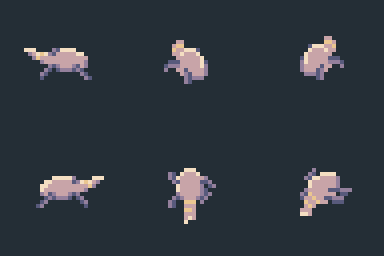
Let's turn it into pixels! I'm using GrafX2 because it reminds me of Deluxe Paint and I can't be bothered putting in the time to learn how to use more modern tools. Maybe if I did the results would look better?

Then, in a "now draw the rest of the effing owl" type thing, we can animate it!

Not perfect, but it will do. Now we just need something for these little creeps to emerge from.
Warning: Dick Jokes
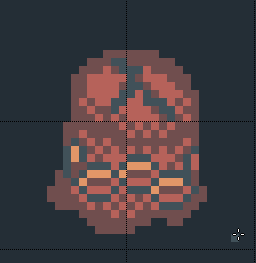
A couple of weeks ago when I was drawing some background tiles for this level, my family pointed out that some of the blobs of... stuff... on the floor looked a bit phallic. They will not be disappointed with this:

And, of course we need to animate it:

Now to get these images into the game.
Technical Junk
The images have been saved as IFF files because I thought I might want to edit them in Deluxe Paint. That hasn't happened yet but what it did mean was I had to write an IFF parser in C#.
Ecliptic uses a domain-specific language to define all the game objects and their behaviour. A compiler written in C# reads the source files and produces a set of data and resource files. The data files can be loaded into memory and accessed as a hierarchy of C++ structs.
Images and Animations
Images, whether they're frames of animation, background tiles or the images from the title and transition screens are organized into ImageSets. Each ImageSet has a corresponding resource file containing the bitmap data that can be loaded on demand.
The source definition looks like this:
Begin ImageSet
    ID = xenowasp_juvenile_1 ; ID of this ImageSet.
    Source xenowasp_juvenile ; Name of the image file to get
                             ; images from.
    Depth = 4                ; Generate a resource with four
                             ; bitplanes.
    Mask = True              ; Create masks of the images.
    Border = True            ; Put a 1 pixel black border
                             ; around the image.
    ; Then all the images.
    Begin Image
        ID = xenowasp_egg_1
        Border = False
        X = 3
        Y = 0
    End
    ...
The compiled version, when disassembled, looks like this:
000041e0:  ImageSet
000041e2:    Size: 604 bytes
000041e4:    Next: 00004434
000041e6:    ID: 000020ec game.imageset.xenowasp_juvenile_1
000041e8:    ResourceID: 001a
000041ea:    ResourcePointer: 00000000
000041ee:    MaskOffset: 00001c20
000041f2:    Cols: 0140
000041f4:    BytesPerRow: 0028
000041f6:    Rows: 002d
000041f8:    Flags: 00
000041fa:    Depth: 4
000041fa:    Pad: 0000
000041fc:    Plane 0: 00000000
00004200:    Plane 1: 00000708
00004204:    Plane 2: 00000e10
00004208:    Plane 3: 00001518
And can be accessed in C++ with this struct:
struct ImageSetType : public Writable
{
    UWORD resourceID;           // ID of the R_XXXX file
                                // containing the bitmap
                                // data.
    Resource *resource;         // Pointer to the Resource
                                // object that controls the
                                // bitmap memory.
    ULONG maskOffset;           // Offset into the resource
                                // of the mask plane.
    UWORD cols;                 // Width in pixels.
    struct MinBitMap bitMap;    // A duplicate of the
                                // graphics.library BitMap
                                // struct without all the
                                // plane pointers.
};
The ImageSet divides the source image up into tiles - by default, 32 by 32 pixels - and each Image is defined by its X and Y offset in tiles. So an Image at X = 3, Y = 1 would be cut out of the source at pixel position of 96, 32. The Images are packed into another bitmap and written to disk as a resource file.
Images can be combined into Animations:
    Begin Anim
        ID = xenowasp_egg_open
        FrameWait = 5
        Begin Frames
            $game.imageset.xenowasp_juvenile_1.image.xenowasp_egg_1
            $game.imageset.xenowasp_juvenile_1.image.xenowasp_egg_2
            $game.imageset.xenowasp_juvenile_1.image.xenowasp_egg_3
            $game.imageset.xenowasp_juvenile_1.image.xenowasp_egg_4
        End
    End
Objects can be nested within each other and are referenced by a path starting with $game using a repeating pattern of <type>.<id>. In this case, the Images that make up the frames of animation are referenced as $game.imageset.<imageset id>.image.<image id>. All object definitions in the game can be referenced this way and many objects can be containers for other objects.
For the monster itself, there will be a separate animation for each direction it can face. These are collected together into an AnimSet so the game engine can pick the correct Anim depending on the direction it's facing.
Watch Out For Monsters
Monsters are defined in the same sort of way but there are some differences. Monster definitions - along with Items, Players, Rooms, Missions and the root Game - are instantiated as objects at run time. These objects live in a garbage-collected heap. The save and load game mechanism simply writes or reads the heap contents to or from a file on disk.
Begin Monster
    ID = xenowasp_juvenile
            ;
            ; Monsters and Items can be organized into
            ; an inheritance hierarchy.
    Base = $game.monster.monster_base
            ;
            ; Strings are defined with a language code
            ; so the game can be translated.
    Name[en] = Xenowasp Juvenile
    Description[en] = It doesn't have the hard carapace
       and sharp claws of it's older siblings but can still
       do some damage, especially when there's a swarm of
       them.
            ; Width and height are defined in map tiles
            ; Size affects whether you can see past the
            ; monster.
    Width = 1
    Height = 1
    Size = #small
            ;
            ; Movement attributes. Slower monsters
            ; have higher costs to movement and turning
    MoveCost = 1
    TurnCost = 1
    MoveAnim = $game.animset.xenowasp_juvenile_move
            ;
    MaxHealth = 10       ; Also known as Hit Points.
            ;
            ; Armour and CombatAbility define the
            ; monster's attacking and defensive ability.
    Armour = 3
    CombatAbility = 3
            ;
            ; Combat related attributes.
            ; Monsters with higher intelligence can
            ; avoid dangerous obstacles or even open
            ; doors.
            ; Target/Patrol modes vary the monster's
            ; behaviour when searching for targets.
            ; AttackEffect is the Effect object that
            ; actually implements the monster's
            ; attack.
    Intelligence = #Int_Low
    TargetMode = #Target_Closest
    PatrolMode = #Patrol_Room
    AttackRange = 1
    AttackCost = 6
    AttackEffect = $game.effect.xenowasp_juvenile_attack
    AttackType = #hit_edge
            ;
            ; Resilience values can change how much
            ; damage the monster takes from an attack.
    Begin Resilience
        Acid = #res_normal
        Bludgeon = #res_low
        Edge = #res_low
        Explosion = #res_low
        Fire = #res_low
        Laser = #res_low
        Projectile = #res_low
        Radiation = #res_low
    End
End
Now the monster is defined, we can move on to the egg. This is also a type of monster but is marked as "passive" - it doesn't move or attack.
Begin Monster
    ID = xenowasp_egg
    Name[en] = Xenowasp Egg
    Description[en] = Leathery and vaguely phallic...
      ;
      ; Passive monsters don't move or attack but
      ; they can be destroyed.
    Passive = #true
    Width = 1
    Height = 1
    MaxHealth = 10
    Armour = 2
    Size = #large
      ;
      ; Even though it can't move, it needs this
      ; because we derive the current map image from
      ; the move animation.
    MoveAnim = $game.monster.xenowasp_egg.anim.open
The egg defines a couple of custom attributes for keeping track of its state.
      ; The maximum number of bugs that can emerge
      ; from this egg.
    Begin Attribute
        ID = max_occupant_count
        BitCount = 4
        Value = 8
    End
      ;
      ; Upon activation we'll pick a number up to
      ; the maximum.
    Begin Attribute
        ID = occupant_count
        BitCount = 4
        Value = 0
    End
Attributes have an ID and a BitCount, and can optionally be initialized with a value. Each object can define up to 64 bits of attributes and an individual attribute can be up to 16 bits in size. Not all 64 bits are available - the game engine does use some.
We also need some events to make things happen.
      ; Emitted when the egg is opened and it's
      ; time for the monster to pop out.
    Begin Event
        ID = spawn
    End
      ;
      ; Emitted when the monster has fully emerged
      ; and moved into position.
    Begin Event
        ID = spawn_completed
    End
These events are defined in the context of the egg and have no meaning elsewhere. Other event types are known and emitted by the game engine.
Getting a Handle
So far, so good but how does the monster get spawned from the egg? Ecliptic's language is not just some demented offspring of Pascal and XML, it also defines a stack-based virtual machine for implementing event handlers.
This is not a general purpose virtual machine that can be used to build a whole game. Code only executes in response to events and the data it can access is mostly limited to it's execution context - the object that owns the event, the actor that triggered the event, the object being targeted by the event and a few other things. The event handlers also have a block of 256 bytes of memory for stack space and local variables.
Handlers are single-threaded and run sequentially. Many handlers must be executed each frame. If an operation cannot be completed in a single frame - like having the player select a target - it must be broken into multiple handlers, one to initiate the target selection and another to be called after the target is selected.
Let's dissect a simple one!
    ;
    ; When activated, pick a random number of
    ; juvenile xenowasps to emerge, one per turn.
    ;
    Begin Handler
          ;
          ; Trigger when the game emits an
          ; "activated" event with this egg as the
          ; target.
        EventID = $game.event.activated
        MatchTarget = True
          ;
          ; Start of VM code
        Begin
          ;
          ; Lines beginning with asterisks are macros
          ; that get expanded at compile time. This
          ; one makes the target of the event the
          ; currently "selected" object.
            *select_target
          ;
          ; Push the value of the max_occupant_count
          ; Attribute onto the stack.
            Push $game.monster.xenowasp_egg.attribute.max_occupant_count
          ;
          ; Pop the value from the stack and push a
          ; random number less than that value onto
          ; the stack.
            Rand
          ;
          ; Add 1 to the random number so it is always
          ; greater than 0.
            Push 1
            Add
          ;
          ; Pop the value from the stack and store it
          ; in the occupant_count attribute.
            Store $game.monster.xenowasp_egg.attribute.occupant_count
        End
    End
This is a handler for the $game.event.activated event. When monsters or items are added to the map, they are usually considered inactive until one of the player's robots see them. At that time, their event handlers are registered and they will start receiving events. An activated event is emitted that targets the object, letting it perform some initial action.
When compiled we end up with this:
00006664:  Code
00006666:    Size: 24 bytes
00006668:    Next: 00006674
0000666a:    ID: 0000332e game.monster.xenowasp_egg.handler.activated_25592x.code.l238
0000666c:    Locals: 0000                 ;  Op Args
0000666e:      0000: Select(Target)          1b
0000666e:      0001: Push(Attribute)   48  4 24 30 04
0000666e:      0004: Rand                    70
0000666e:      0005: Push(Constant)  0001    21 00 01
0000666e:      0008: Add                     40
0000666e:      0009: Store(Attribute)  52  4 34 34 04
0000666e:      000c: Exit                    58
0000666e:      000d: Nop                     00
Mate! Spawn! And Die!
Some meatier examples are what happens each time a monster is spawned.
First up is a handler for the monsters_turn_started event. This is emitted by the game when control switches from the player to the monsters.
    Begin Handler
        EventID = $game.event.monsters_turn_started
        MatchAny = True
        Begin
            *select_owner
              ;
              ; Is the egg empty?
            Push $game.monster.xenowasp_egg.attribute.occupant_count
            Push 0
            Cmp
            Equal
            Exit
              ;
              ; The egg isn't empty, so open up and
              ; spawn a Xenowasp Juvenile
              ;
              ; Pause the game until we're done
              ; spawning.
            *arg !Wait:WaitEventID $game.monster.xenowasp_egg.event.spawn_completed
            Push 1
              ;
              ; This does not wait within the handler
              ; context, it makes the game engine wait
              ; before executing the monster's turn.
            Wait
              ;
              ; Set the egg's map image to be the fully
              ; opened frame.
            Push $game.imageset.xenowasp_juvenile_1.image.xenowasp_egg_4
            Store !Monster:MapImageID
              ;
              ; Start the "open" animation and emit a
              ; $game.monster.xenowasp_egg.event.spawn
              ; event when done.
            *arg !Anim:Target !selected
            *arg !Anim:CompletionEventID $game.monster.xenowasp_egg.event.spawn
              ;
              ; Adjust the speed of the opening anim so
              ; multiple eggs won't be completely in sync
            Push 15
            Rand
            Push 5
            Add
            Push #!Anim:FrameWait
            *start_anim $game.monster.xenowasp_egg.anim.open 3
        End
    End
This handler will cause the egg to play its opening animation and, when complete emit an event that triggers the next handler, the one that actually spawns the monster. It triggers the closing animation, tries to create the new monster, makes sure it's facing in the right direction and plays its "walk" animation from the egg to the location it spawned at.
    Begin Handler
        EventID = $game.monster.xenowasp_egg.event.spawn
        MatchTarget = True
          ;
          ; Local variable to store a pointer to the
          ; monster.
        Begin Local
            ID = child
            Size = 4
        End
        Begin
            *select_target
              ;
              ; Play the Close Egg animation.
            *arg !Anim:Target !selected
            *start_anim $game.monster.xenowasp_egg.anim.close 1
              ;
              ; Try to spawn a Juvenile Xenowasp
            *arg !Spawn:Position !Monster:Position
            *arg !Spawn:In #spawn_map
              ;
              ; *arg is a macro that will push two values
              ; onto the stack, an identifier like
              ; !Spawn:TypeID - the type of object to
              ; create - and a value.
            *arg !Spawn:TypeID $game.monster.xenowasp_juvenile
              ;
              ; This macro pushes 3 - the number of args
              ; onto the stack and calls the Spawn
              ; operation.
            *spawn 3
            Store !Local:child
              ;
              ; Did we manage to spawn one? There has to
              ; be room next to the egg.
            Push !Local:child
            Push !Null
            Cmp32
            NotEqual
            Jump spawn_success
              ;
              ; If we didn't manage to spawn, emit an event
              ; to allow the game to continue.
            *emit_event $game.monster.xenowasp_egg.event.spawn_completed 0
            Exit
            Label spawn_success
              ;
              ; The new monster will be in a tile adjacent
              ; to the egg, make sure its facing the right
              ; direction.
            Push !Monster:Position
            Push !Local:child
            Store !selected
            Push !Monster:Position
            Facing
            Store !Monster:Facing
              ;
              ; Hide the new monster for now while we play
              ; the animation of it walking to its position.
            Push 0
            Store $game.monster.xenowasp_juvenile.attribute.visible
              ;
              ; Play it's walk animation from the egg to
              ; it's actual position.
            *arg !Anim:Target !selected
            *arg !Anim:TargetPosition !Monster:Position
            *arg !Anim:CompletionEventID $game.monster.xenowasp_egg.event.spawn_completed
              ;
              ; Vary the speed of the animation.
            Push 4
            Rand
            Push 1
            Add
            Push #!Anim:Speed
            *select_target
            *arg !Anim:Position !Monster:Position
            *start_anim $game.animset.xenowasp_juvenile_move 5
              ;
              ; Record that we've spawned.
            Push 1
            Push $game.monster.xenowasp_egg.attribute.occupant_count
            Sub
            Store $game.monster.xenowasp_egg.attribute.occupant_count
        End
    End
Both these handlers make a lot of use of the *arg macro. Because many of the operations performed by the virtual machine are quite complex - emitting events, triggering animations, showing speech bubbles and so on - I needed a consistent way to pass complex sets of parameters. Taking a leaf out of the AmigaOS developer's book, I'm using a list of key-value pairs pushed onto the stack.
The last thing pushed onto the stack will be the number of arguments. When executing an operation that takes arguments, the virtual machine will first pop the argument count and then pop each key and value in turn.
The Fireworks Factory?
Are you still with me? That was a lot of stuff to get through! I hope you found this dive into the internal workings of Ecliptic interesting.
As a reward for making it this far, here's a video of the new monsters in action.
Get Ecliptic
Ecliptic
Turn-based sci-fi RPG for the Amiga
| Status | In development |
| Author | bwldrbst |
| Genre | Role Playing |
| Tags | Amiga, Retro, Sci-fi, Tactical RPG, Turn-based |
| Languages | English |
More posts
- December 2025 Update6 days ago
- August 2025 UpdateAug 25, 2025
- April 2025 UpdateApr 25, 2025
- Better Late Than NeverMar 09, 2025
- January 2025 UpdateJan 26, 2025
- September 2024 Demo BuildSep 26, 2024
- September 2024 UpdateSep 24, 2024
- June 2024 UpdateJun 24, 2024
- Let's Pack Heat!Jun 10, 2024

Leave a comment
Log in with itch.io to leave a comment.